Firmware Flashing
Here you can find all program files and source code links related to the Otto DIY robot.
Source Code Repositories
ESP32+AI Version Source Code
- GitHub Repository: Xiaozhi ESP32 AI Robot Source Code
- Features: Includes all features such as Wi-Fi connection, voice recognition, AI dialogue
- For: Users interested in development and customization
Original Arduino Source Code
- GitHub Repository: Otto DIY Original Arduino Source Code
- Features: Basic movement, expression, and sound functions
- For: Arduino version Otto DIY
Firmware Downloads
ESP32+AI Version Firmware
| Version | Release Date | Feature Description | Download Link |
|---|---|---|---|
| v2.0.5 | 2025-12-8 | Updated battery lower limit, battery level not updated during actions | 2.0.5 |
| v2.0.4-2 | 2025-11-17 | Added WeChat Mini Program control/calibration/customization features | 2.0.4-2 |
| v2.0.4 | 2025-10-31 | Updated to Xiaozhi 2.0.4 with added fixed actions and AI custom programmed actions, see MCP tools in User Manual for details | 2.0.4 |
| v1.4.4 | 2025-6-13 | Added initial position calibration, "Dialogue: calibrate left foot to 10 degrees/-10 degrees" | 1.4.4 |
| v1.4.3 | 2025-6-13 | fix(ota): Fixed OTA upgrade crash bug | 1.4.3 |
| v1.4.2 | 2025-6-5 | 1. Code standardization 2. Fixed theme switching bug | 1.4.2 |
| v1.4.0 | 2025-6-5 | 1. Updated to Xiaozhi 1.7.0 2. MCP protocol control robot actions 3. GIF expressions inherit lcdDisplay, Otto-specific theme | 1.4.0 |
| v1.3.1 | 2025-5-27 | 1. Added task priority to prevent listening state action slowdown 2. Action task resident, no detach to solve "jerking" bug, but increases power consumption 3. Home restoration 500 | 1.3.1 |
| v1.2 | 2025-4-26 | Added arm function code | 1.2 |
| v1.1 | 2025-4-23 | Updated to Xiaozhi 1.6.0, fixed sudden "paralysis" bug | 1.1 |
| v1.0 | 2025-4-9 | Initial version with basic movement and voice control features | 1.0 |
Download the latest firmware, compatible with all circuit board versions
WeChat Mini Program
Version v2.0.4-2 supports robot control, calibration, and customization through WeChat Mini Program. Scan the QR code below to use:

WeChat Mini Program QR Code
Flashing Tools
- ESP32 Flash Download Tool: Download Link
- For Windows systems
- ESPTool (Command Line):
pip install esptool- For Linux, macOS, and Windows
Merge Firmware Command
If you need to merge firmware yourself, use the following command:
esptool.py --chip esp32s3 merge_bin -o merged-flash.bin --flash_mode dio --flash_size 16MB 0x0 build/bootloader/bootloader.bin 0x100000 build/xiaozhi.bin 0x8000 build/partition_table/partition-table.bin 0xd000 build/ota_data_initial.bin 0x10000 build/srmodels/srmodels.bin
Flashing Guide
Make sure the battery is installed before flashing!!!!!!!!- Download the latest firmware file (.bin)
- Download and install the flashing tool
- Connect Otto to computer via USB (Note: If ESP32 is being flashed for the first time, you need to hold the BOOT button before turning on the switch!!!!!!!!)
- Launch the flashing tool and select the correct COM port
- Set flashing parameters as follows:
- Baud Rate: 921600
- Flash Address: 0x0
- Select the downloaded firmware file
- Click "Start" to flash
- After flashing is complete, restart the board!!!!!!!!
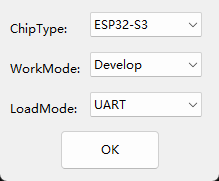
Figure 1: Select ESP32S3, serial port
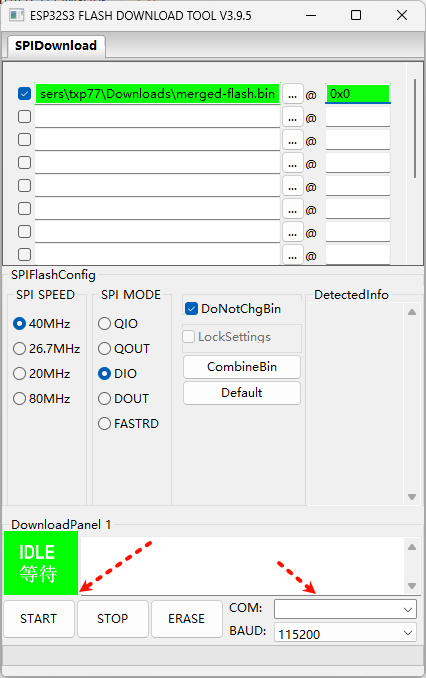
Figure 2: Select program, COM, start download
FAQ
-
What to do if flashing fails?
- Check USB connection
- Hold the BOOT button on the board while flashing
- Try reducing baud rate to 115200
-
Firmware compatibility issues?
- Confirm you are using the recommended ESP32 model
- Check if peripheral hardware matches the reference design